
Mountain boot and crampon guide
The following information is intended as a general introduction to the types of mountain boots available and their properties. If you are at all unsure which type of boot is appropriate for the trip that you are coming on then please do speak to us before buying or renting any kit.
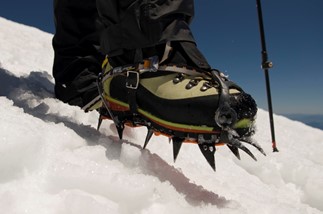
What are crampons?
Crampons are accessories that attach to your boots and are used for hiking. Most crampons require a special type of boot, or mountaineering boot. They do not make crampons for hiking boots (these are a totally different type of traction device). The reason is because crampons require a stiff-shanked boot in order to stay attached to your boot safely.
Boot grading for crampons
Boots for any climb over snow and ice need to be of a type that will allow fitting of crampons. Boots are graded according to their compatibility with different types of crampon.

Boots graded B0 are not suitable for use with crampons. The sole is not stiff enough to prevent them moving differently to the crampon with the result that the crampons will move around and may come off altogether. They are also not very stiff in their upper section and may not provide enough support to your ankle or enough rigidity to allow 'edging' of the boot in snow when not using crampons.
Boots Graded B1 are suitable for use with strap-on C1 crampons for use on moderate snow and ice conditions. They have fairly stiff soles so that the crampon does not loosen or come off as the boot flexes during walking. They are also fairly stiff on the upper part so that they provide good ankle support and allow edging in the snow when not using crampons. They are however not so stiff that they are too uncomfortable to walk in off the snow.
Boots Graded B2 are suitable for use with C1 or C2 crampons. C2 crampons have a clip lever at the back and therefore require the boot to have a protruding shelf at the heel for the end of the heel lever to engage with. The boots have a stiffer sole than B1 boots and will help to keep the crampon in place on moderate mountaineering climbs. Some B2 boots are still flexible enough to be used on an approach walk although this is very dependent on the materials and construction of the upper.
Boots Graded B3 are suitable for use with technical C3 crampons. The boot is fully rigid and allows the crampon to be used on more technical climbs (where there is likely to be sustained use of the crampon's front points) without the crampon loosening. B3 boots are likely to be very uncomfortable for approach walks and trekking as they are rigid and often heavily insulated.
On all climbs or treks where crampons will be used, your boots will need to be rated at least B1 or B2 for use with crampons.
If you choose to purchase your own crampons prior to the trip please ensure that you take your boots to the shop and ask a suitably experienced person to check the fit of the crampons with the boot. Some combinations of boot and crampon do not provide a good match and can lead to poorly fitting crampons and consequent problems on the mountain. If you are planning on using overboots to upgrade the warmth of a boot you will also have to check carefully if the crampon will be secure. You may need to cut out sections of the overboot to align with heel or toe bails.
Boot grading for warmth
Aside from allowing the fitting of crampons, another very important consideration when choosing your mountain boots is that of warmth. For anything other than technical climbing, this is likely to be the over-riding factor in your choice of boot. Different types of boots are constructed differently, with different materials and built up in layers. Usually, on warmer boots, the layers are able to be separated into an inner and outer boot. This helps as it allows you to warm/dry the inners and also to wear them inside the tent.
It sounds obvious when it is pointed out, but it is not just the ambient air temperature that is an issue. If you are walking on snow, your feet lose heat through the sole of your foot into the cold ground. This is made even worse if the snow is not hard packed, as you may be ankle or even shin-deep in the stuff and your whole foot and lower leg may be conducting heat to the snow. Therefore, it is also the condition of the mountain that affects which boots are needed, aside from just the altitude or location.
Inevitably, the warmer the boot the more volume and bulk it has to it and usually the more expensive it is too. Using a boot that is too warm can be as problematic as having one that is not warm enough. It will lead to excessive sweating which is uncomfortable and can ultimately lead to greater chance of blisters, cold feet or even frostbite- when you stop working hard, the sweat conducts warmth away from your feet, or can even freeze.
Above the snowline there are four main options, in descending order of warmth:
- 'Triple-Boots' for 8000m or very cold peaks (eg Cho Oyu, Everest, Denali) such as Millet Everest, La Sportiva Olympus Mons, Scarpa Phantom 800. These are constructed with inner boot, shell and super-gaiter.
- 'Plastics' like the Scarpa Omega or Vega, preferably with a high altitude rated inner boot for warmth (eg for Elbrus). These are a double-boot with a shell and a liner boot. These can also be upgraded with an overboot (eg 40 Below Purple Haze) if over about 6000m (eg Muztagh Ata), which will usually it up to a limit of about 8000m.
- 'Hybrids' like the La Sportiva Spantik or Scarpa Phantom Guide which are a double or even triple boot but the outer boot is not solid plastic so that it can be more dextrous and comfortable. This may also need to have its warmth upgraded. These are popular on Elbrus and trekking peaks in Nepal like Island Peak, Mera Peak and on our Khumbu Peaks trip, and all the way up to Aconcagua.
- '4-Season' boots like Scarpa Charmoz or Manta; these are what you would commonly use in UK winter conditions. They would be suitable for mountains like Toubkal in winter, Yala Peak, possibly Island Peak and Mera Peak.
Choosing and fitting mountain boots
If you are buying expensive boots for an expedition it is strongly recommended that you visit a specialist retailer with trained staff, proper foot-measuring facilities (length & width) and a wide range of brands and models. This will allow you to try out a range of different boots before committing to one.
Another important thing is to take the exact socks that you will wear on the trip with you to the shop. You need to try the boot on with the right sock as this can make a huge difference to the volume and comfort of the fit. Good shops will have also have some simulated terrain so that you can walk up and downhill in the boots. When you get home, wear the boots around the house for a few days, walk up and down the stairs etc. Most shops will allow you to exchange boots within a certain time period as long as they haven't been used outside.
When fitting your boots, you often need to go up a half size or so from what you would buy in a normal shoe. This will allow for thick socks and some extra space as your feet swell at altitude. Generally, on high mountains, you are walking very slowly and deliberately and will not experience the same amount of movement that you would with a hiking boot. However, you do need to ensure that when walking you do not experience any 'heel-lift' inside the boot and that there is sufficient space around your toes for you to wiggle them. Any tighter than this and it is likely that they will either rub and give you blisters or be so constricting as to restrict the blood supply and lead to cold toes.
Note that certain boot brands commonly produce boots of a certain shape, ie. a narrower or wider fit. If your feet are of a certain shape it is worth identifying the most appropriate manufacturer for you. Some manufacturers such as Scarpa have 'thermo-fit' liners for their plastic boots; these are heated in an oven and then put on with special toe-spacers, the liner then moulds to the shape of your foot and when it has cools it stays in that shape. When the toe-spacer is removed it leaves some space for your toes with the rest fitting snugly. You will need to go to a shop with this facility to get this done properly.
Below Snowline and Approach Boots
Below the snowline, it is possible to use B0 graded hiking boots; make sure they are worn in, but not worn out, and have good ankle support. However, a good solution for smaller peaks is to use a B1 or B2 Four-Season boot which can then be used on the peak too. This means that you don't need to bring another set of boots.
To give you a rough idea of which boots you need for some example trips, we strongly recommend that you talk to us and read the trip-specific information before you spend lots of money on new kit.